
Benny's Perch
This outlines the process I followed to build a perch for our dog, Benny, allowing him to look out the front window while we work during the day. It was an enjoyable design challenge, and I gained valuable woodworking skills from my brother along the way.

This is our old couch from our apartment in New York. Benny immediately took to jumping on the couch and sitting throughout the day. He likes to watch the passersby, bark at all the dogs, and protect our home from those vicious Amazon delivery men. There was about a 5-month gap where we had a delivery date for new chairs and sold the couch. Benny moped around the house that whole time. He couldn’t see out the window. And he would lay on the floor in the sun and follow it as it moved throughout the day. We felt so bad for him.
It all starts small with simple measurements. These let me know the parameters I had to work with – how wide it needed to be for him to be comfortable, where the windows are, how tall, etc. Once I have this down, I can go to the computer to start working on designs.


This top version is where I landed. I also have a model with stair rail, drawers, and a kickplate. I plan on adding those things but not sure if I will. The rail was for his safety but he’s using it fine without. And now that I have it in the house, I think it may be more aesthetically pleasing without. I’d still like to add the drawers and kickplate though.
I really liked the idea of the stairs being formed in uniform increments to create additional shelves. They ended up looking too modern for the space though.
I also worked on a version where we could hide a large flat screen TV. Ultimately, we decided we didn’t want a TV in the bar.
I thought getting wood for the project would be like going to Home Depot and buying lumber. But hardwood like this comes in all different thicknesses and widths. As such I wasted a ton of wood because I wanted
exactly ¾” thickness and 10” width throughout the whole piece.


Even though I tried to work out all the measurements on the computer beforehand, we still had to do a ton of calculation on paper. Because, until we got the wood, we didn’t know what lengths we were working with. And if you’re not careful with your cuts up front you’ll waste a lot.
We still wasted a lot of wood during this process. We had to plane every piece down to ¾”. Some were over an inch thick which essentially meant cutting it in half (expensive shavings piled up on the ground). We put that little planer through its paces.

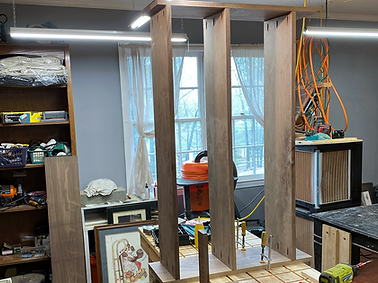
Up until this point I hadn’t realized how massive this thing was going to be (all computer modeling). We had to get it up on its side like this to put it together. It is a beast.
This is where my anal retentiveness started to kick in. There were all of these little edges poking out when we fit it together, but my brother assured me that I would take care of them during the sanding and finishing process.


Top left is unpolished while the others are after finishing. The wood was simply beautiful. But you can’t tell until you begin to grind away all the imperfections. During this process I started to "feel with my hands" more than "see with my eyes". This is after three degrees of varying sandpaper done multiple times each, lacquer, steel wool, repeat, repeat, repeat. We had the benefit of having it in the house for a while unpolished and got used to how it looked unfinished. Seeing it transform like this was so satisfying.
The finished piece. He spends more time here than anywhere else in the house. I was apprehensive at first because he had a hard time with the stairs. But, after two days of training with treats he was going up and down all by himself. It is very satisfying to identify a problem, design a solution, and then see it work as planned.
